How to Implement a Cookie Bar in Ruby on Rails
Selling a service or products online in the European Union obliges you to comply with the European cookie law. It consists of displaying a message to the user to know that the website uses cookies to track him. Because let’s be honest, is there any online shop out there not monitoring users? Analytics are crucial to see which product or page is the most viewed, or when and where visitors come from.
The European Union thinks this would violate the user’s privacy, so pages doing this should warn the user clearly. And the most popular solution is displaying a bar at the bottom or the top of the page.
Until you have the user’s consent, you cannot store cookies in the browser. Thus, if the user doesn’t accept, the visit will not be counted. This is highly problematic for most sites, so many do not follow this rule and just display the message.
I’m going to show you how to implement a straightforward example, using Ruby on Rails, of a cookie bar that will only install the Google Analytics cookie if the user gives consent by clicking the OK button.
Do you want to see this article in video format?
Sample Rails application
Let’s create a new Rails application step by step.
rails new eu-cookie-sampleCode language: Shell Session (shell)Add the faker gem to your Gemfile:
gem 'faker'Code language: Ruby (ruby)And rebuild Bundler dependencies:
cd eu-cookie-sample/
bundle installCode language: Shell Session (shell)
Now create a Home controller with an index view:
rails generate controller Home indexCode language: Shell Session (shell)This will also create a new route for you. Replace it with a root route:
# config/routes.rb

root 'home#index'Code language: Ruby (ruby)
The final step to get your sample app ready is to display some random content. Delete all default content in app/views/home/index.html.erb and add this:
<% Faker::Lorem.paragraphs(number: 40).each do |paragraph| %>
  <p><%= paragraph %></p>
<% end %>Code language: ERB (Embedded Ruby) (erb)
Start the Rails server:
rails sCode language: Shell Session (shell)And load localhost:3000 in your browser.
Your sample application is now showing a significant page enough to scroll.
Loading the cookies library
To handle cookies in the user’s browser, you are going to use the js-cookie JavaScript library. You can find it here: https://github.com/js-cookie/js-cookie
You are going to use its CDN version to load it. Just add this before the closing head tag in app/views/layouts/application.html.erb:
<script src="https://cdn.jsdelivr.net/npm/js-cookie@2/src/js.cookie.min.js"></script>Code language: HTML, XML (xml)Building the message bar
Create a partial to build the message bar in app/views/layouts/_cookies_bar.html.erb:
<div id="cookies-bar" class="cookies-bar">
  <p>
    We use cookies. Do you accept them?
  </p>

  <%= link_to 'Accept', request.original_url, class: 'btn accept' %>
  <%= link_to 'Reject', request.original_url, class: 'btn reject' %>
</div>Code language: ERB (Embedded Ruby) (erb)
For simplicity, I have put a very simple text in the bar, but in reality it would be necessary to add a link pointing to some legal text and instructions to delete cookies.
Now include it in the application layout located at app/views/layouts/application.html.erb, just below the yield call:
<% if cookies[:allow_cookies].blank? %>
  <%= render 'layouts/cookies_bar' %>
<% end %>Code language: ERB (Embedded Ruby) (erb)
What you are checking here is whether the cookie named allow_cookies is set. If it is not, the bar is displayed.
Alternatively, you could also display this partial only for the production environment this way:
<% if !cookies[:allow_cookies] && Rails.env.production? %>Code language: ERB (Embedded Ruby) (erb)Great! Refresh, and you will notice your bar at the very bottom of the page. But it is not sticky and looks messy. Let’s apply some styles.
Styling the bar
Rename the app/assets/stylesheets/home.scss to main.scss and paste this SCSS code:
body {
  font-family: ui-sans-serif, system-ui, -apple-system, BlinkMacSystemFont, "Segoe UI", Roboto, "Helvetica Neue", Arial, "Noto Sans", sans-serif, "Apple Color Emoji", "Segoe UI Emoji", "Segoe UI Symbol", "Noto Color Emoji";
}

.cookies-bar {
  position: sticky;
  bottom: 0;

  padding: 0px 10px 5px 10px;

  border: 1px solid #9CA3AF;
  border-bottom: none;
  background-color: #F3F4F6;

  .btn {
    display: block;
    border: 1px solid #4B5563;
    background-color: #6B7280;
    color: #FFF;
    padding: 5px;
    margin-bottom: 5px;
    text-align: center;
    text-decoration: none;

    &.accept:hover {
      background-color: #047857;
    }
    &.reject:hover {
      background-color: #B91C1C;
    }
  }

  @media (min-width: 768px) {
    display: flex;
    max-width: 700px;
    align-items: center;
    margin: 0 auto;
    padding-bottom: 0;

    .btn {
      padding: 10px 20px;
      margin-left: 10px;
    }
  }
}Code language: SCSS (scss)
This is how the bar looks on mobile:
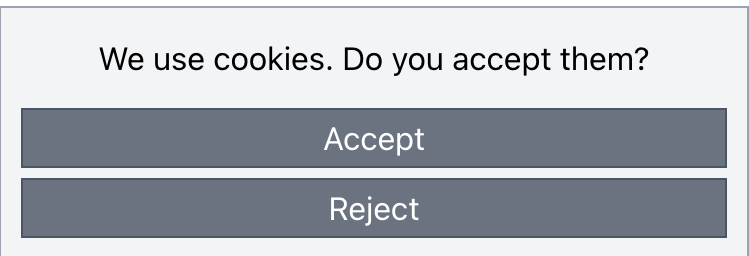
And this is the desktop version:

The JavaScript code
Create the file app/javascript/custom/main.js (create the custom directory too) and paste this:
class CookieBar {
  constructor() {
    this.cookiesBar = document.getElementById('cookies-bar');
  }

  init() {
    if (this.cookiesAllowed()) {
      this.appendGACode();
    }

    this.addButtonBehaviors();
  }

  cookiesAllowed() {
    return Cookies.get('allow_cookies') === 'yes';
  }

  addButtonBehaviors() {
    if (!this.cookiesBar) {
      return;
    }

    this.cookiesBar.querySelector('.accept').addEventListener('click', () => this.allowCookies(true));

    this.cookiesBar.querySelector('.reject').addEventListener('click', () => this.allowCookies(false));
  }

  appendGACode() {
    const ga = "(function(i,s,o,g,r,a,m){i['GoogleAnalyticsObject']=r;i[r]=i[r]||function(){" +
      "(i[r].q=i[r].q||[]).push(arguments)},i[r].l=1*new Date();a=s.createElement(o)," +
      "m=s.getElementsByTagName(o)[0];a.async=1;a.src=g;m.parentNode.insertBefore(a,m)" +
      "})(window,document,'script','//www.google-analytics.com/analytics.js','ga');" +
      "ga('create', 'UA-XXXXX-Y', 'auto');" + "ga('send', 'pageview');";

    document.getElementsByTagName('head')[0].append('<script>' + ga + '</script>');
  }

  allowCookies(allow) {
    if (allow) {
      Cookies.set('allow_cookies', 'yes', {
        expires: 365
      });

      this.appendGACode();
    } else {
      Cookies.set('allow_cookies', 'no', {
        expires: 365
      });
    }

    this.cookiesBar.classList.add('hidden');
  }
}

window.onload = function() {
  const cookieBar = new CookieBar();

  cookieBar.init();
}
Code language: JavaScript (javascript)
This code has two parts: the class and the onload event.
If you look at the onload event, you will see that the class is created, and then the init method is called. Let’s break down the flow of these operations.
- The constructor creates a class variable where it stores a reference to the cookie bar.
- The
initevent checks if the user has already accepted the cookies (this is where it usesCookies.getfrom the library you included from the CDN). If so, it adds the Analytics code. - Then it adds the behavior to the buttons on the toolbar.
- The
addButtonBehaviorsmethod checks for the existence of the cookie bar. Remember that you told Rails only to display it if the cookie has not been set yet. Therefore, if it is not shown, the method returns.- If the bar exists, then an Event Listener is added to each button, which will call the
allowCookiesmethod. - The
allowCookiesmethod looks at the argument you pass and sets theallow_cookiescookie to the value ‘yes’ or ‘no’, with an expiration date of 1 year. Also, if consent has been given, it adds the Analytics code.
- If the bar exists, then an Event Listener is added to each button, which will call the
The file you just created has to be loaded by Rails. This is done by modifying the application.js file inside the packs subdirectory.
Add this require after the last import:
require("custom/main")Code language: Ruby (ruby)Now try it!
- If you accept cookies, the bar will disappear, and the Analytics code will be added. If you refresh the page, the bar will not appear because the cookie is saved in the browser, and the Analytics code is added again.
- If you reject cookies, the Analytics code will not be added, and the bar will no longer appear until you manually delete the cookie from your browser. If you refresh the page, this behavior will be kept.
If you are using Chrome or any other Chromium-based browser, open the developer tools and open the Application tab. There look for Cookies in the sidebar and expand it to click on the URL that appears. You will be able to see the cookie, its value, and you will be able to delete it.
I have uploaded the sample application to GitHub: https://github.com/davidmles/eu-cookie-sample
Conclusion
It’s not that hard to implement your solution to follow the EU cookies law. This way, you will control it better instead of using a plugin that limits you in some way.
I hope this law changes soon, so this is unnecessary, but meanwhile I think it’s a clean and straightforward solution.
Comments (11)
David Demeny
Hi, thanks for the tutorial !
When I do not click accept or reject on the front page and go to another page the buttons do not work any more.
Is this a valid bug or is it just me messing up something?
David Morales Author
Hi David. Can you check the console, see if there are any errors?
David Demeny
Unfortunately, no errors in console.
I use Hotwire, it may something to do with the error.
David Morales Author
Try to use some other browser, disabling extensions, using private mode… You could even try adding some breakpoint in the JS code to see where it is stopping. Or maybe the JS file is not even loading at all. Try to send something to the console from the file, so you can debug.
David Demeny
Thanks for the suggestions, will do these checks.
James
Not working with Rails 7, I have implemented your solution in a Rails engine that is then added to a Rails 7 app gemfile and no javascript is loaded as far as I can tell but I do get a console error
Uncaught SyntaxError: import declarations may only appear at top level of a module application-37f365cbecf1fa2810a8303f4b6571676fa1f9c56c248528bc14ddb857531b95.js:2
following the link reveals the following message
// Configure your import map in config/importmap.rb. Read more: https://github.com/rails/importmap-rails
import “@hotwired/turbo-rails”
import “controllers”;
I have no idea where those two have come from, this is a fresh new app with nothing but a few engines I have created added
David Morales Author
Rails 7 has a completely new way to handle Javascript libraries. importmap.rb is the file where you must “pin” libraries, that are get from npm.
The tutorial was written a few years ago, and I have updated some bits to keep it up-to-date, but if your project uses importmap.rb you should adapt the way you include the scripts.
Tal S.
Ran into a problem with the scss, ran `bundle exec rails assets:precompile` and that solved it. Maybe consider adding that to the tutorial?
Dmytro
hello David, thanks for the good tutorial!
btw, for rails 7 works also, I just changed initialising:
“`
document.addEventListener(“turbo:load”, function(event) {
const cookieBar = new CookieBar();
cookieBar.init();
})
“`
Patrick
The banner is not going away on mobile. Have you gotten any reports of that before?
Troy
David,
Any chance this tutorial could be updated for Rails 7/Importmaps? I’ve pinned the library in importmaps.rb but am now getting JS errors related to “main.js”. Specifically, an “Uncaught TypeError: Failed to resolve module specifier” error.
Thanks.